ROTARY BROACHING GUIDE

Rotary Broaching is a fast and easy method of
producing polygonal drive features in turned parts.
Genevieve Swiss offers Premium Rotary Broaching
products made in-house and available for shipment.
A Guide To Internal Rotary Broaching
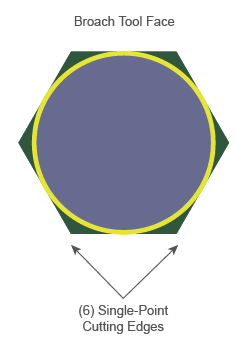
During the rotary broach operation, the broach tool approaches the work piece at a small angle. The tool spins synchronously with the part, creating a wobble effect that causes the leading cutting edge to rotate in and out of the cut like a cam. This method shapes internal and external polygonal profiles at a single-point. Compared to punch forming, which shapes the entire profile at once, rotary broaching requires 80% less force, offers increased tool life, and lowers machine maintenence cost over time.
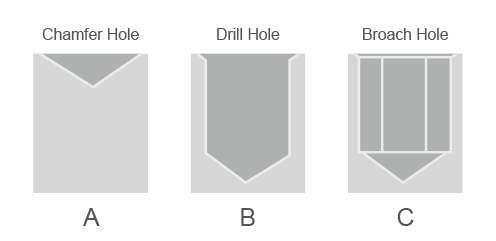
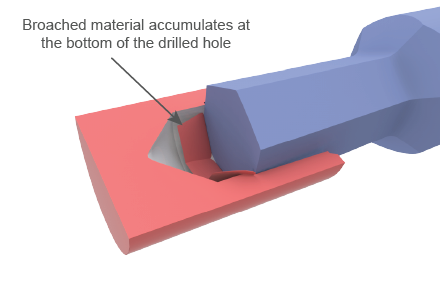
The advantages offered by rotary broaching result from proper preparation prior to the broaching operation. The most important part of this preparation includes drilling a hole which allows for broached material to accumulate, preventing damage to the broach tool and machine. Continue with the guide below for some important tips on rotary broaching.
Preparing To Broach
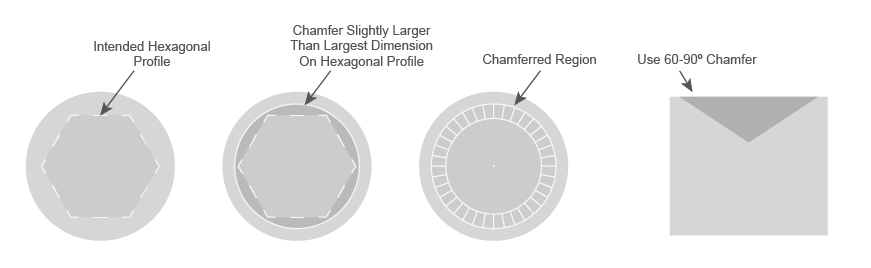
First, prepare the hole with a 60° - 90° chamfer slightly bigger than the largest dimension of the broach tool. A chamfer provides a guide for the broach tool.
Drilling The Hole
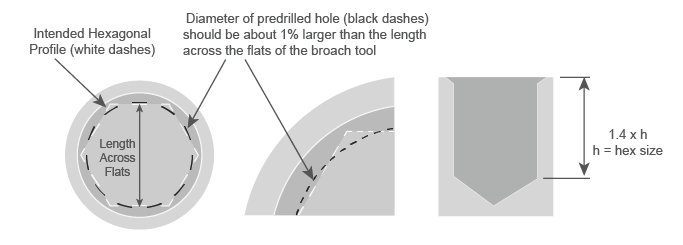
For internal broaching, the diameter of the hole should be 1 percent larger than the diameter across the flats of the broach’s hex shape and drilled as deep as possible. A depth of 1.3 to 1.5 times the depth of the broached profile is recommended. Drilling to this depth is vital, leaving room for material accumulation during the broaching process. If material accumulates during the drilling process, re-drill the hole with a smaller drill.
If A Drill Radius Is Not Allowed
Many medical and aerospace applications do not allow for a drill radius along the broached walls of the part. When exact concentricity is required, chamfer, drill, and then pre-bore the hole. Using a micro bore allows for extra control and accuracy. The use of a drill might lead to inaccuracies due to deflection and other conditions.
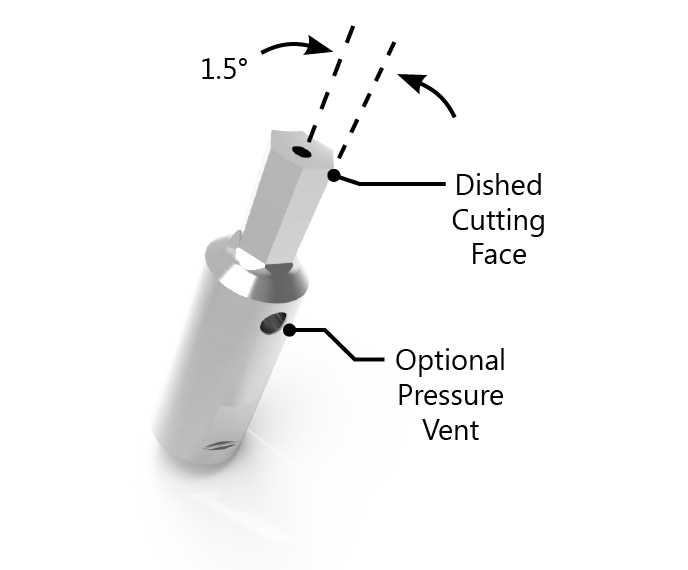
NOTE: Broaching into a tight hole will not allow air or coolant to escape, resulting in a build up of pressure. This can cause the part or tool to push back, damaging the tool or machine. Use a GenSwiss broach that has a pressure relief vent.
Broaching The Hole
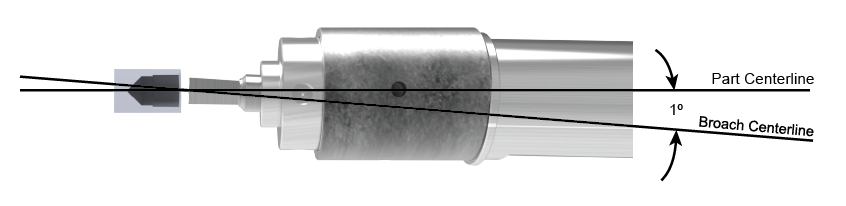
Rotary broach holders hold the broach tool at a 1º angle relative to the centerline of the workpiece. As the broach holder rotates, the broach tool is pushed into the pre-drilled hole. During the beginning of broaching, when the broach is touching the material, the edges could break if the speed is too high.
For best results, start the broach operation at a slow rotation, and then increase the speed when it is in full contact. We recommend for the first 1mm a reduced speed of 500 rpm max.
The feed rate mainly depends on the material characteristics. In mild steel, 0.0012 to 0.0024 inches per revolution is recommended. If the machine thrust force is sufficient, the feed can be doubled as machinability increases. In most cases the maximum feed rate should not exceed 0.03 times the profile diameter. A slower feed rate will produce an improved finish with finer lines along the sidwalls of the broached hole. By increasing the feed rate, the cutting cycle will be faster, but the broaching lines will be more pronounced, leaving a coarse finish. We do not recommend speeds over 2,000 rpm.
Give GenSwiss A Call For More Information 1-413-562-4800